
6 Simple Steps on How To Install SPD Cleats to Your Bike Pedals
How to install SPD Cleats – Professional mountain bikers often use SPD (Shimano Pedaling Dynamics) cleats, which are attachments that go on their bike’s pedals to maximize their efficiency.
These are most often used with clipless pedals because they don’t have a toe clip or a strap to secure your foot on the pedal. If your mountain bike doesn’t have clips or straps, then SPD cleats are essential.
But how to install SPD cleats ? The following article will tell you all you need to know about this mountain bike essential.
Disclaimer: Some of the links in this article are affiliate links and I may earn a commission if you click on them, at no additional cost to you. Hope you find the information here useful! Thanks.
Related Articles:Â
- How to Change a Bike Seat [Seat Replacement and Positioning]
- How to Put Chain Back on Bike in 5 Simple Steps for Beginners
- How to Tighten a Bike Chain – Easiest Way for Different Gears
How Do SPD Cleats Work?
SPD cleats can be attached to the sole of compatible bike shoes, at which point you can attach your shoes to the pedals, at which point you’ll be physically locked in. It works in essentially the same way that Peloton shoes are attached to the pedals of those bikes, and is designed for more efficiency and power for your pedalling.
SPD cleats aren’t the only cleats designed for mountain bikers- but they are the most popular. Because SPD shoes don’t come with the cleats already installed, it can be tricky to know how to put them on yourself, which is why the following guide will come in handy.
Keep this nice and compact Ball End Hex Key Wrench Set with you at all times in your bike pouch for on the go repairs and fixes.

How To Install Cleats On Your SPD Compatible Shoes
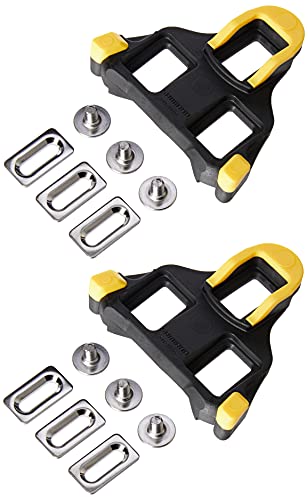
You don’t need much equipment to install cleats. As long as your mountain bikes have spaces designed for cleats installation and you have your cleats, the base plate, the cleat bolt, and a hex wrench or other suitable tightening tool, you should be all set.
- Remove the bottom plate, this can be done by using your wrench to remove the bolts from the cutout in the sole of the shoe and then removing the bottom plate. This is where you’ll be attaching your cleats. Some mountain bike shoes won’t have a bottom plate, in which case you can just skip this step.
- Install the base plate of the cleats. Find the empty slots in the sole of the shoe, and insert your base plate gently. Now you’ll need to decide whether or not you’re going to need to insert a spacer between your shoes and the cleats.
The reason you might need to do so is if the sole is catching in the pedal cage. If it’s catching even slightly you’re going to need to add a spacer.
- Adjust the position of your cleats. Place them over the metal band protective plate, but don’t tighten it quite yet.
- Insert the inside of the cleats on the metal plate, making sure they’re aligned with the base plate’s bolt holes. Then, insert your bolts (the ones that came with your cleats) and insert them in the bolt holes. Use your wrench to tighten them, but not so much that you won’t be able to adjust the cleats’ position.
- Adjust the position of the cleats. Ride your bike around for a while, and if they feel comfortable, then you won’t need to adjust them any further.
- Finally, fully tighten them using your hex wrench. They must be completely tightened, otherwise, there’s the risk of them becoming displaced when you’re riding on rough terrain, or the cleats getting caught in your pedal cage.
Is There A Difference Between SPD-SL Cleats and SPD Cleats?
These days, the acronym ‘SPD’ is essentially synonymous with bike shoe cleats in general. But they’re not the only kind of bike shoe cleats. SPD means Shimano Pedaling Dynamics, but the additional SL stands for SuperLight.
While SPD cleats are used for the pedals of mountain bikes, SPD-SL cleats are more often used for the pedals of road bikes, which explains their reduced weight. This lower weight is the main difference between SPD cleats and SPD-SL cleats.
SPD cleats are also made of metal compared to the plastic SPD-SL cleats, and they’re smaller than their SuperLight counterparts.
SPD cleats are often referred to as ‘two bolt cleats’ because two bolts are used to fix them to the sole of mountain bike shoes. SPD-SL cleats, on the other hand, are fixed to the shoes with three bolts. Likewise they are often referred to as ‘three bolt cleats’.

The Benefits of Using SPD Cleats Over SPD-SL Cleats
There are a number of benefits to using SPD cleats over SuperLight cleats when you’re mountain biking. The majority of SPD pedals are double sided, which means you can clip your shoes onto either side of the bike’s pedals. This makes it a lot quicker to resume cycling when you’re stationary.
Most SPD cleats also allow your feet to rotate on a vertical axis for increased comfort.
SPD cleats are smaller, which makes it a lot easier to walk with them installed. They’re the best choice if you’re going to be walking more than just short distances in your bike shoes.
The tread of the sole will lessen the risk of you slipping on smooth surfaces, and will provide sufficient grip generally, so you’ll also be able to climb with ease when you’re not riding. If you use your bike for commuting they’re a good choice, because your feet will be on the ground quite a lot.
They’re also designed to shed mud, which means they’re resistant to clogging, making them the ideal choice for cyclocross racing.
Conclusion
The process of installing SPD cleats on SPD compatible bike shoes is very simple, and following the steps we’ve provided should ensure a comfortable and secure ride.
It’s important to make sure that your cleats are in the right position for your feet and for your pedals, and you can ensure this by taking your mountain bike out for a test ride- or multiple test rides if needs be. It may take a bit of trial and error, but this is perfectly normal.

![5 Quick and Easy Steps on How to Inflate a Presta Valve [2022]](https://www.ridersonwheels.com/wp-content/uploads/2022/02/How-to-Inflate-a-Presta-Valve-768x512.jpg)


![How to Wrap a Bike as a Presentable Christmas Present [2022]](https://www.ridersonwheels.com/wp-content/uploads/2022/02/How-To-Wrap-A-Bike-768x512.jpg)